
In this lecture, We are going to learn about the customizer and we create our own global theme options. This helps us to change colors, fonts, and header images just like we change logos by adding theme support and uploading in the customizer. The most important thing to know is customizer API is object-oriented.
Customizer Objects
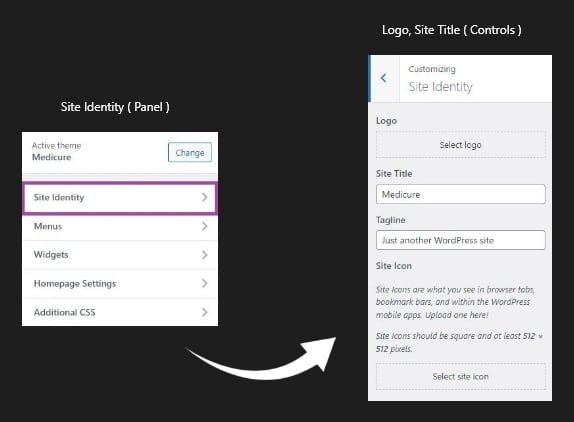
Customizer API is based on four types of objects: Panels, Sections, Settings, and Controls. These controls are associated with UI elements of the customizer that are saved in the database. The panel is the container of sections, In a single panel, we have to assign multiple sections. Section are containers also which contain some sort of controls, Control is functionality. But most of the time we create panel and add control to it, we skip section part. The below example will clarify this whole scenario easily:
Customizer Manager
The customizer manager provides different kinds of pre-build objects for add_, get_, and remove_. But this time we use only add_ to register our first customizer penal. Below code is to add_ object by using customize_register hook.
function med_customize_register( $wp_customize ) {
    $wp_customize->add_panel();
    $wp_customize->add_section();
    $wp_customize->add_setting();
    $wp_customize->add_control();
  }
add_action('customize_register','med_customize_register');
Follow the below step and get your first customizer theme options. Note: if you want to get exact the same result you should add the last function on your code. Below code is just to explain last function.
Add Panel
We need to put “Theme Options” panel by using add_panel method on customizer object.
// Theme Options Panel
$wp_customize->add_panel( 'theme_options',
    array(
        'title' => __('Theme Options'),
        'description' => ' ', // add description if you want
        'priority' => 1,
    )
);

Add Section
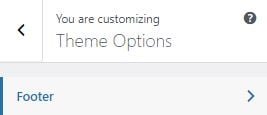
Now it’s time to add a footer section for footer copyright text, the background color of that section in our Theme Options Panel by using add_section method on customizer object.
// Add a footer/copyright information section.
$wp_customize->add_section( 'footer' , array(
    'title' => __( 'Footer' ),
    'priority' => 105, // Before Widgets.
    'panel' => 'theme_options'
) );
Add Setting
Now it’s time to add settings on the customizer, setting is used to handle live-previewing, saving, sanitization, and also setting type, capability, and transport just like below.
// Setting for Copyright Text
$wp_customize->add_setting('copyright_text',
    array(
        'type' => 'theme_mod',
        'capability' => 'edit_theme_options',
        'default' => __('All rights reserved'),
        'sanitize_callback' => 'sanitize_text_field',
        'transport' => 'refresh',
    )
);
Add Control
The last thing is to add control in customizer. Control is an object for creating UI associated with the setting and saved data in the database.
$wp_customize->add_control('copyright_text',
    array(
        'type' => 'text',
        'priority' => 10,
        'section' => 'footer',
        'label' => 'Copyright text',
        'description' => 'Text put here will be outputted in the footer',
    )
);

The most important parameter to add control types. WordPress provides us with some prebuild control types. Like: input, checkbox, text area, radio, select, and dropdown pages. Also, input types have some extra attributes text, hidden, number, range, url, tel, email, search, time, date, and date-time.
Color Functionality
As you know, we have different types of controls. We have also color picker functionality to add color dynamically. just copy and paste the below section, setting, and control code in your customizer function.
// Color Options Section Inside Theme Options
$wp_customize->add_section( 'nav_color_options',
    array(
        'title' => __( 'Nav Background Color'),
        'priority' => 1,
        'panel' => 'theme_options'
    )
);

$wp_customize->add_setting('nav_bg_color',
    array(
        'type' => 'theme_mod',
        'capability' => 'edit_theme_options',
        'transport' => 'refresh',
        'default' => '#f72525',
        'sanitize_callback' => 'sanitize_hex_color',
    )
);

$wp_customize->add_control(  new WP_Customize_Color_Control( $wp_customize, 'nav_bg_color', array(
    'label' => 'Menu Background',
    'section' => 'nav_color_options',
)  )   );
Final Customizer Function
Add the below code in functions.php file and you will your first customizer “Theme Options”.
function med_customize_register( $wp_customize ){

    // Theme Options Panel
    $wp_customize->add_panel( 'theme_options',
        array(
            'title' => __('Theme Options'),
            'description' => ' ', // add description if you want
            'priority' => 1,
        )
    );

    // Text Options Section Inside Theme Options
    $wp_customize->add_section( 'text_options',
        array(
            'title' => __( 'Footer Copyright'),
            'priority' => 1,
            'panel' => 'theme_options'
        )
    );

    // Add a footer/copyright information section.
    $wp_customize->add_section( 'footer' , array(
        'title' => __( 'Footer' ),
        'priority' => 105, // Before Widgets.
        'panel' => 'theme_options'
    ) );

    // Setting for Copyright Text
    $wp_customize->add_setting('copyright_text',
        array(
            'type' => 'theme_mod',
            'capability' => 'edit_theme_options',
            'default' => __('All rights reserved'),
            'sanitize_callback' => 'sanitize_text_field',
            'transport' => 'refresh',
        )
    );

    $wp_customize->add_control('copyright_text',
        array(
            'type' => 'text',
            'priority' => 10,
            'section' => 'footer',
            'label' => 'Copyright text',
            'description' => 'Text put here will be outputted in the footer',
        )
    );

    // Color Options Section Inside Theme Options
    $wp_customize->add_section( 'nav_color_options',
        array(
            'title' => __( 'Nav Background Color'),
            'priority' => 1,
            'panel' => 'theme_options'
        )
    );

    $wp_customize->add_setting('nav_bg_color',
        array(
            'type' => 'theme_mod',
            'capability' => 'edit_theme_options',
            'transport' => 'refresh',
            'default' => '#f72525',
            'sanitize_callback' => 'sanitize_hex_color',

        )
    );

    $wp_customize->add_control(  new WP_Customize_Color_Control( $wp_customize, 'nav_bg_color', array(
            'label' => 'Menu Background',
            'section' => 'nav_color_options',
    )  )   );

}
add_action( 'customize_register', 'med_customize_register' );
After registering the theme options customizer, It’s time to display dynamic data which comes from the customizer.
Display Input Text
Copy below code to display input text, which we just created as a copyright input text field in this lecture.
<?php
$text = get_theme_mod('copyright_text')  ;
?>
<p><?php echo $text ?></p>
Dynamic CSS Code
Below code for color picker to change background navigation color, which we just created as a color picker field in this lecture. Copy below code and paste it into header.php file after wp_header() method.
<style type="text/css">
    footer{
        background: <?php echo get_theme_mod( 'nav_bg_color' ) ?> !important;
    }
</style>
Some important tips for newbies, this theme development series is for basic custom wordpress. we are trying to clarify your concept about core wordpress and wordpress hierarchy. which help you to understand how wordpress works.
#BeingCodeStuffer


