
Now, it’s time to add some major theme supports to make your custom theme more dynamic and functional. We create a function to add all basic supports. For: Header title, Featured image, Search form, Website logo, and Navigation menu. Just copy below function and paste in functions.php file.
// Theme Supports
function med_suppports(){

    // website header title
    add_theme_support("title-tag");
    // for feature image
    add_theme_support("post-thumbnails");
    // for search form
    add_theme_support("html5",array('search-form'));
    // for website logo
    add_theme_support("custom-logo");
    // Navigation Menu
    add_theme_support('menus');
    // Widgets
    add_theme_support('widgets');

}
add_action('after_setup_theme','med_suppports');
After theme supports. We will register navigation hook location and assign menu to that hook location.
Register Hook Location
// Menu Hook Location
register_nav_menus(

    array(
        'top-menu' => 'Top Menu Location',
        'mobile-menu' => 'Mobile Menu Locatin',
    )

);
when your hook location register successfully, create a menu and add an item to it, also check the hook location where you want.
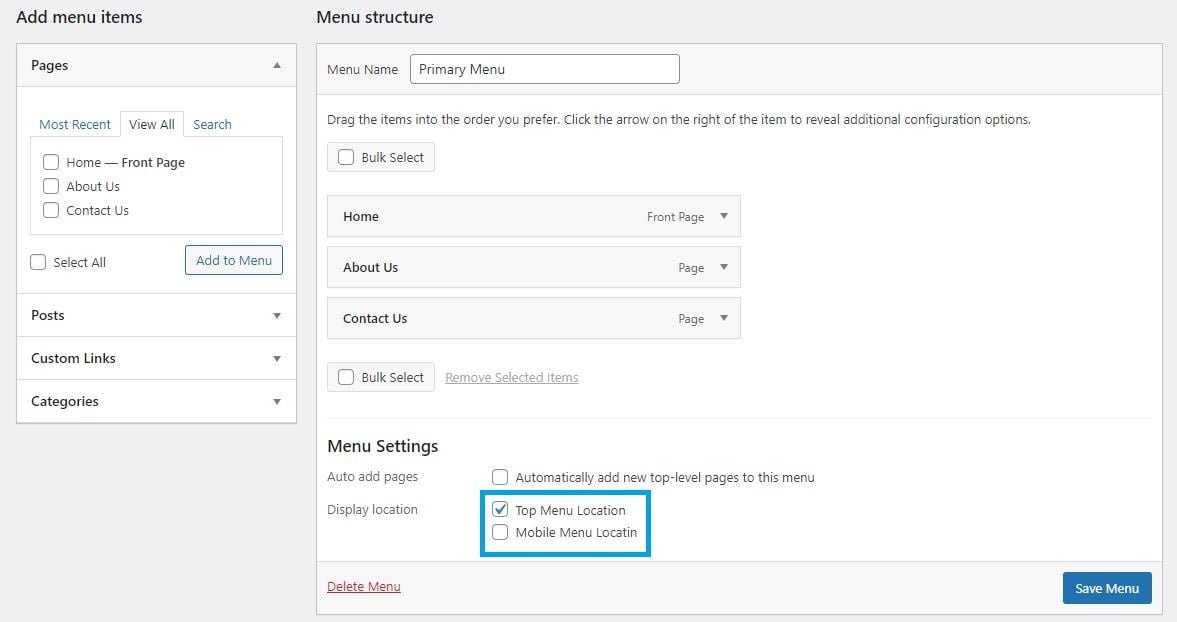
Display location is an ID of hook which we created above. We select specific location and get that menu by using that location just like below. We use Top Menu Location in header.php file, and we use bootstrap menu. So, it helps us to make website little bit user-friendly.
Boostrap Dynamic Navigation
We will do some extra code to insert bootstrap class in menu link. Don’t worry, just follow below code and get a similar result.
For header.php
Add below code in header.php file, after body tag.
<!-- Navigation -->
<nav class="navbar navbar-expand-lg bg-light">
  <div class="container">
    <a class="navbar-brand" href="#">Navbar</a>
    <button class="navbar-toggler" type="button" data-bs-toggle="collapse" data-bs-target="#navbarNavAltMarkup" aria-controls="navbarNavAltMarkup" aria-expanded="false" aria-label="Toggle navigation">
      <span class="navbar-toggler-icon"></span>
    </button>
    <div class="collapse navbar-collapse justify-content-end" id="navbarNavAltMarkup">
    <?php
        wp_nav_menu(
            array(

                'theme_location' => 'top-menu',
                'menu_class' => 'navbar-nav'
            )
        );
    ?>

  </div>
</nav>
For CSS:
Add below code in app.css file which we create to make your current page link highlighted.
.current-menu-item a.nav-link {
    color: black !important;
    font-weight: 600 !important;
}
For Functions.php
Add below code in functions.php. This code is to add ‘nav-link‘ bootstrap class in anchor tag.
//Filter to Add Class in a of Menu
function add_link_atts($atts){
    $atts['class']='nav-link';
    return  $atts;
}
add_filter('nav_menu_link_attributes','add_link_atts');
Here is the final result of what we have done so far.

We move one step forward and add a copyright footer as well.
<!-- Footer -->
<footer class="mt-4 text-center text-lg-start bg-light text-muted">
  <!-- Copyright -->
  <div class="text-center p-4" style="background-color: rgba(0, 0, 0, 0.05);">
   © All rights reserved. Made by
   <a class="text-decoration-none text-reset fw-bold" href="https://codestuffing.com/">Codestuffing</a>
  </div>
  <!-- Copyright -->
</footer>
<!-- Footer -->

#BeingCodeStuffer


